One of the most painful limits when working with modern GPUs isn’t compute power – it’s video memory. You buy a decent GeForce card, start playing with real-world models, and very quickly hit the hard wall of VRAM. At that moment you don’t need more TFLOPS, you just wish your GPU had “a bit more memory” so the model would finally fit.
emuV is a low-level Linux driver that does exactly that for NVIDIA GeForce cards: it exposes a virtual pool of GPU memory by transparently extending VRAM with system RAM. From the application’s point of view, it sees one combined memory space, while under the hood emuV keeps real VRAM as the fast first tier and automatically spills the overflow into regular RAM. The source code and documentation are available on GitHub in the open-source repository: github.com/bogdanovby/emuV, where you can download the driver and follow installation instructions.
Both the implementation of emuV and the original article below were created by Pavel Bahdanau, CTO of pinvps.com. What follows is his original English text from the project’s GitHub docs, where Pavel explains how the driver works internally, how auto spillover is implemented, and what practical limitations and use cases you should keep in mind when using virtual GPU memory in real projects.
Introduction
In the era of Large Language Models (LLMs) and generative AI, one of the most critical bottlenecks is GPU memory (VRAM). Models like LLaMA 3 70B, Stable Diffusion XL, and Midjourney require tens of gigabytes of VRAM for efficient operation. Consumer GPUs like the RTX 4070 with 12 GB often fall short when running large models or processing large batches.
emuV (Virtual GPU Memory Emulator) is a Linux kernel driver that addresses this limitation by extending available VRAM with system RAM. The project is particularly valuable for:
- ML Engineers working with large models
- Researchers training neural networks on limited hardware
- Developers testing applications across different GPU configurations
- DevOps Engineers building virtualized GPU environments
The Problem: The VRAM Wall in Machine Learning
Why is VRAM So Critical?
Modern neural networks store in video memory:
- Model Weights – network parameters (LLaMA 70B: ~140 GB in FP16)
- Activations – intermediate computation results
- Gradients – for training (doubles memory requirements)
- Optimizer States – Adam, AdamW states (+2x memory)
- Data Batches – input and output tensors
Typical Out-of-Memory Scenarios:
import torch
from transformers import AutoModelForCausalLM

# Loading a 7B parameter model
model = AutoModelForCausalLM.from_pretrained(
    "meta-llama/Llama-2-7b-hf",
    torch_dtype=torch.float16
)
# ❌ CUDA out of memory: requires ~14 GB, available 12 GB

# Stable Diffusion XL
from diffusers import DiffusionPipeline
pipe = DiffusionPipeline.from_pretrained(
    "stabilityai/stable-diffusion-xl-base-1.0"
)
# ❌ OOM with batch_size > 1 on RTX 4070
Existing Solutions and Their Limitations:
Model Quantization (INT8, INT4)
- ✅ Reduces memory requirements 2-4x
- ❌ Loss of model quality❌ Not all operations support quantization
CPU Offloading
model.to("cpu") # Slow
- ✅ Works with any model size
- ❌ 100-1000x slower than GPU❌ Constant CPU↔GPU transfers Gradient Checkpointing
- ✅ Saves memory on activations
- ❌ Slows training by 20-30%❌ Doesn’t solve model size problem Model Parallelism
- ✅ Distribution across multiple GPUs
- ❌ Requires multiple GPUs❌ Expensive (RTX 4090 × 4 = $8000+)
How emuV Works: Architecture and Mechanisms
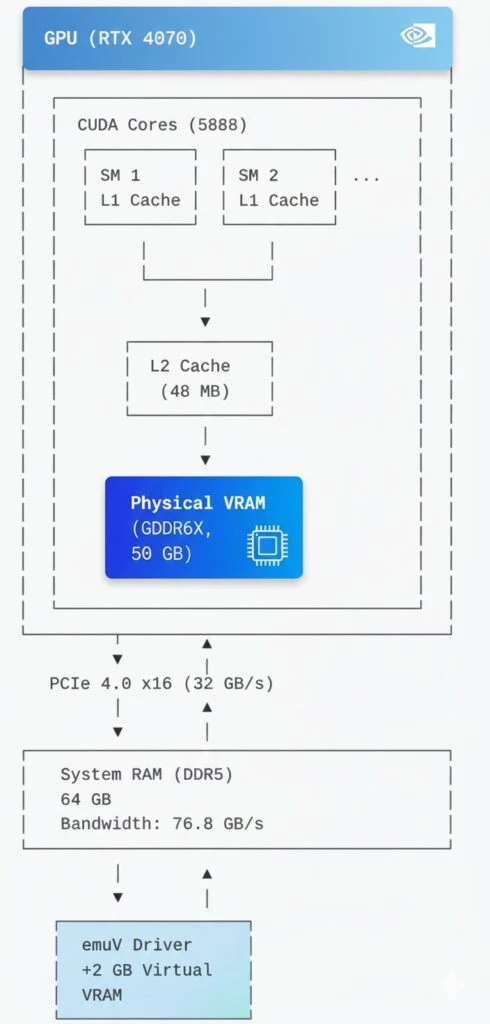
1. NVIDIA GPU Architecture and Memory Management
Modern NVIDIA GPUs use a memory hierarchy:
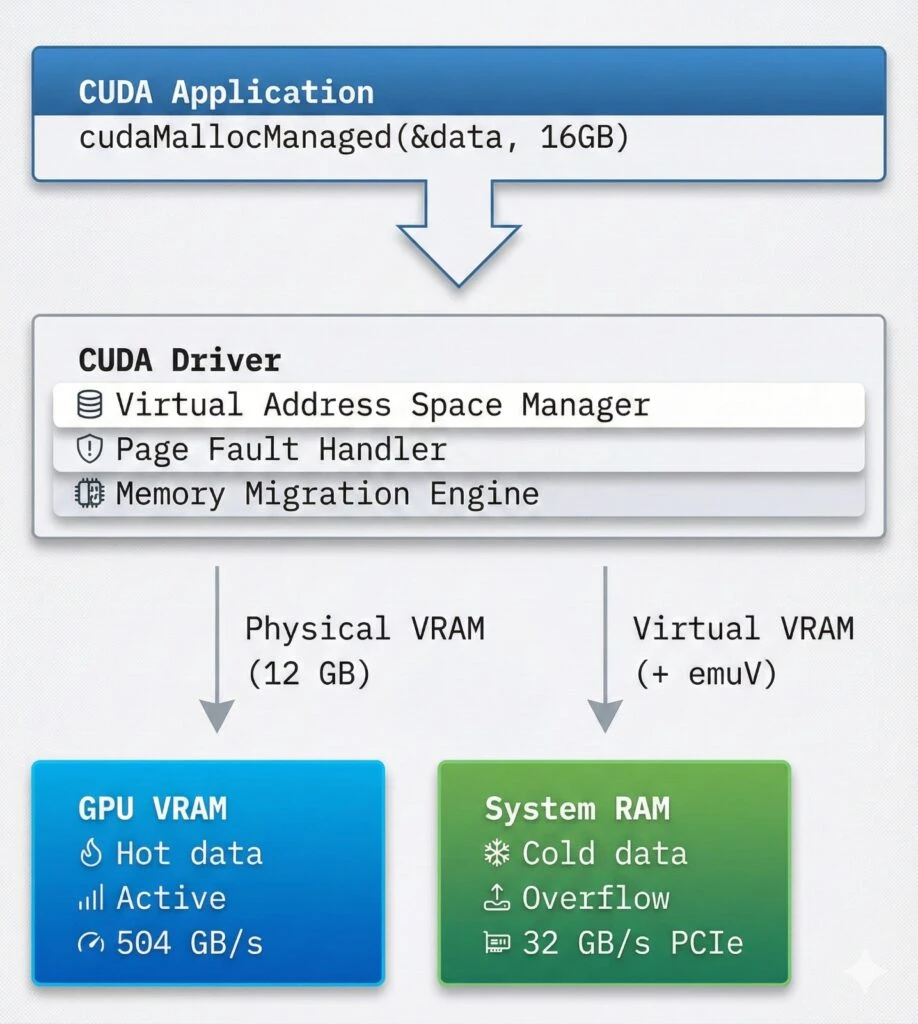
2. CUDA Unified Memory and cudaMallocManaged
CUDA provides Unified Memory, creating a single address space for CPU and GPU:
// Traditional CUDA memory allocation
float *d_data;
cudaMalloc(&d_data, size);           // GPU only
cudaMemcpy(d_data, h_data, size,
           cudaMemcpyHostToDevice);  // Explicit copy

// Unified Memory
float *data;
cudaMallocManaged(&data, size);      // CPU + GPU
// Automatic data migration!
How cudaMallocManaged Works:
Allocation: Creates virtual address space
Page Faults: First access triggers page fault
Migration: CUDA runtime migrates pages between CPU/GPU
Caching: Frequently used data stays on GPU
3. emuV Operating Mechanism
emuV operates at the Linux kernel level, intercepting VRAM requests:
// Virtual GPU device structure
struct emuv_device {
    // Configuration
    struct emuv_config config;
    const char *gpu_name;          // "NVIDIA GeForce RTX 4070"

    // Memory
    u64 physical_vram_size;        // 12 GB (real VRAM)
    u64 virtual_vram_size;         // +2 GB (from system RAM)
    u64 total_vram_size;           // = 14 GB

    // Virtual memory
    void *virtual_vram;            // vmalloc(2GB)
    bool lazy_allocation;          // Allocate on demand

    // Interfaces
    struct device *device;         // /dev/emuv
    struct cdev cdev;              // Character device
};
Memory Access Algorithm:
// On VRAM address access
int emuv_vram_access(u64 offset, void *buffer, size_t size)
{
    if (offset < physical_vram_size) {
        // Address in physical VRAM
        // → direct GPU access
        return gpu_vram_access(offset, buffer, size);
    }
    else {
        // Address in virtual VRAM
        u64 virtual_offset = offset - physical_vram_size;

        // Lazy allocation: allocate on first access
        if (!virtual_vram) {
            virtual_vram = vmalloc(virtual_vram_size);
            memset(virtual_vram, 0, virtual_vram_size);
        }

        // System RAM access
        return system_ram_access(virtual_offset, buffer, size);
    }
}
4. CUDA Integration
CUDA sees extended VRAM through Device Memory Oversubscription:

Practical Applications: Running Large Models
Case Study 1: Stable Diffusion XL with Increased Batch Size
Without emuV:
from diffusers import DiffusionPipeline
import torch

pipe = DiffusionPipeline.from_pretrained(
    "stabilityai/stable-diffusion-xl-base-1.0",
    torch_dtype=torch.float16
).to("cuda")

# ❌ OOM Error with batch_size > 1
images = pipe(
    prompt=["A cat"] * 4,  # batch_size=4
    num_inference_steps=50
)
# CUDA out of memory: 12.2 GB required, 12 GB available
With emuV (+2 GB):
# Load emuV with 2 GB extension
sudo insmod emuv.ko gpu_model=4070 physical_vram_gb=12 virtual_vram_gb=2

# Verify
cat /sys/class/emuv/emuv/vram_info
# Total VRAM: 14 GB
# Now it works!
images = pipe(
prompt=["A cat", "A dog", "A bird", "A fish"],
num_inference_steps=50,
guidance_scale=7.5
).images # ✅ Success! Used 13.8 GBResults:
- Batch size increased from 1 to 4
- Generation speed: 3.2x faster (overhead amortization)
- Additional latency: ~15% due to RAM access
Case Study 2: Fine-tuning LLaMA 2 7B
Problem: Fine-tuning requires storing:
- Model: 7B × 2 bytes (FP16) = 14 GB
- Gradients: +14 GB
- Optimizer states (Adam): +28 GB
- Total: ~56 GB (RTX 4070 = 12 GB ❌)
Solution with emuV:
# Configure large extension
sudo insmod emuv.ko gpu_model=4070 physical_vram_gb=12 virtual_vram_gb=48
# Total VRAM: 60 GB
from transformers import AutoModelForCausalLM, TrainingArguments, Trainer
from peft import LoraConfig, get_peft_model
import torch
# Enable CUDA Unified Memory
torch.cuda.set_per_process_memory_fraction(1.0)
model = AutoModelForCausalLM.from_pretrained(
"meta-llama/Llama-2-7b-hf",
torch_dtype=torch.float16,
device_map="auto" # Automatic placement
)
# LoRA to reduce gradient memory
peft_config = LoraConfig(r=16, lora_alpha=32, lora_dropout=0.05)
model = get_peft_model(model, peft_config)
training_args = TrainingArguments(
per_device_train_batch_size=4, # Without emuV: max 1
gradient_accumulation_steps=4,
fp16=True,
optim="adamw_torch",
learning_rate=2e-5,
)
trainer = Trainer(
model=model,
args=training_args,
train_dataset=dataset,
)
# ✅ Training works!
# Physical VRAM: 12 GB (active weights)
# Virtual VRAM: ~20 GB (gradients, optimizer)
trainer.train()Performance:
- Training speed: ~80% of “pure” GPU
- Enables training on previously inaccessible hardware
- Cost savings: vs buying A100 (80GB, $10k+)
Case Study 3: Inference of Large Models with Quantization
from transformers import AutoModelForCausalLM
from auto_gptq import AutoGPTQForCausalLM
import torch

# Load quantized 70B model
model = AutoGPTQForCausalLM.from_quantized(
    "TheBloke/Llama-2-70B-GPTQ",
    model_basename="gptq_model-4bit-128g",
    device_map="auto",
    use_safetensors=True
)

# 70B × 0.5 bytes (4-bit) ≈ 35 GB
# With emuV (12 + 24 GB = 36 GB): ✅ Fits!

# Inference
output = model.generate(
    input_ids,
    max_new_tokens=512,
    do_sample=True,
    temperature=0.7
)
# Speed: ~15-20 tokens/sec
# Without emuV: impossible to run
GPU Virtualization: “Slicing” the GPU
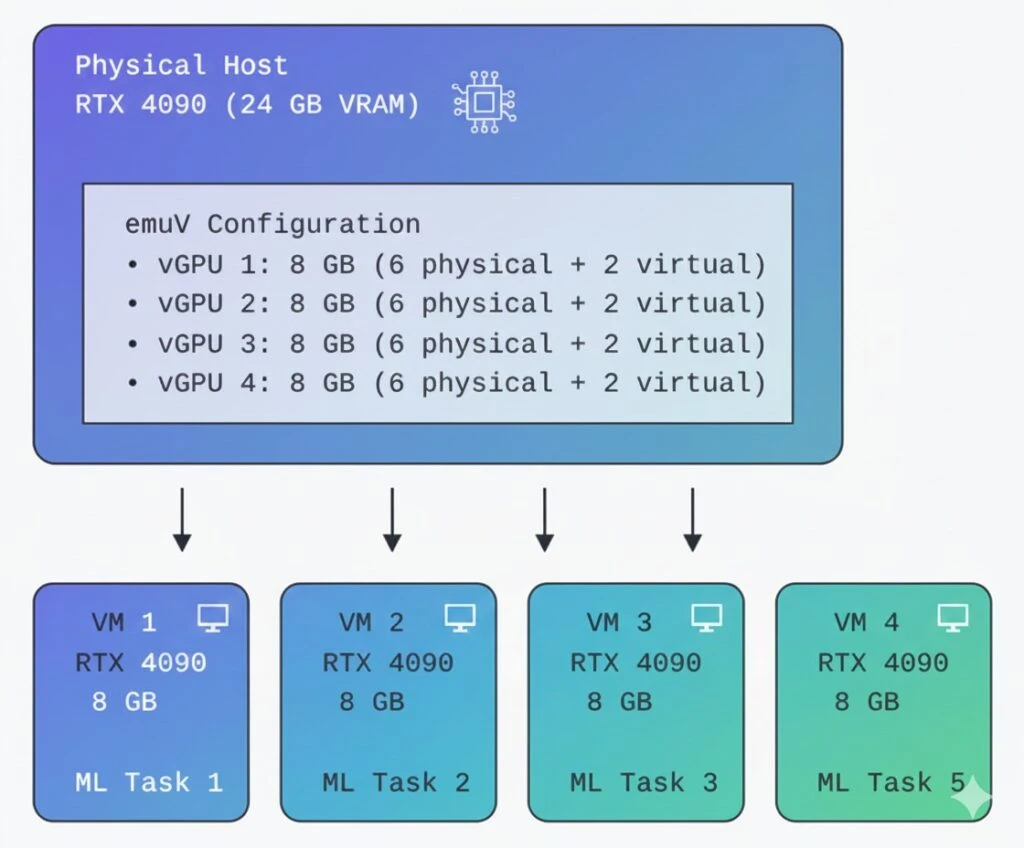
Concept: Multiple Virtual GPUs from One Physical GPU
One of the most powerful applications of emuV is creating multiple virtual GPUs for VMs:
Setting up GPU Passthrough with emuV
Step 1: Host Configuration
# /etc/emuv/vgpu-profiles.conf
[vGPU-Profile-1]
gpu_model=4090
physical_vram_gb=6
virtual_vram_gb=2
pci_device_id=0x2684

[vGPU-Profile-2]
gpu_model=4090
physical_vram_gb=6
virtual_vram_gb=2
pci_device_id=0x2685

[vGPU-Profile-3]
gpu_model=4090
physical_vram_gb=6
virtual_vram_gb=2
pci_device_id=0x2686

[vGPU-Profile-4]
gpu_model=4090
physical_vram_gb=6
virtual_vram_gb=2
pci_device_id=0x2687
Step 2: Create Virtual GPUs
# Create 4 virtual GPUs
for i in {1..4}; do
    sudo insmod emuv.ko \
        gpu_model=4090 \
        physical_vram_gb=6 \
        virtual_vram_gb=2 \
        instance_id=$i
done

# Verify
ls /sys/class/emuv/
# emuv0  emuv1  emuv2  emuv3

# Check memory on each
for i in {0..3}; do
    echo "vGPU $i:"
    cat /sys/class/emuv/emuv$i/vram_info
done
Step 3: Configure QEMU/KVM VM
<!-- VM 1: /etc/libvirt/qemu/ml-worker-1.xml -->
<domain type='kvm'>
  <name>ml-worker-1</name>
  <memory unit='GiB'>32</memory>
  <vcpu>8</vcpu>

  <devices>
    <!-- Virtual GPU #1 passthrough -->
    <hostdev mode='subsystem' type='pci' managed='yes'>
      <driver name='vfio'/>
      <source>
        <address domain='0x0000' bus='0x01' slot='0x00' function='0x0'/>
      </source>
      <address type='pci' domain='0x0000' bus='0x00' slot='0x05' function='0x0'/>
    </hostdev>

    <!-- emuV device node -->
    <filesystem type='mount' accessmode='passthrough'>
      <source dir='/dev/emuv0'/>
      <target dir='vgpu'/>
    </filesystem>
  </devices>
</domain>
Step 4: Launch and Test
# Start VMs
virsh start ml-worker-1
virsh start ml-worker-2
virsh start ml-worker-3
virsh start ml-worker-4

# In each VM
virsh console ml-worker-1

# Inside VM
nvidia-smi
# GPU 0: NVIDIA GeForce RTX 4090
# Memory: 8192 MiB

# Run ML task
python train_model.py --device cuda:0
Virtualization Use Cases
1. Multi-tenant ML Platform
┌─────────────────────────────────────────┐
│  ML Platform (Cloud Provider)           │
│  Physical: 8× RTX 4090 (192 GB total)   │
│                                         │
│  emuV: 32 virtual GPUs × 8 GB           │
│       = 32 isolated users               │
│                                         │
│  Usage:                                 │
│  • 24 vGPU: Training jobs               │
│  • 8 vGPU: Inference services           │
└─────────────────────────────────────────┘Benefits:
- Isolation between users
- Flexible resource allocation
- Oversubscription: 256 GB virtual from 192 GB physical
- Utilization: 95%+ (vs 60-70% without slicing)
2. Development/Testing Environment
# Development configuration
# docker-compose.yml

services:
  dev-env-small:
    image: pytorch/pytorch:latest
    devices:
      - /dev/emuv0:/dev/nvidia0  # 4 GB
    environment:
      - CUDA_VISIBLE_DEVICES=0

  dev-env-medium:
    image: tensorflow/tensorflow:latest-gpu
    devices:
      - /dev/emuv1:/dev/nvidia0  # 8 GB
    environment:
      - CUDA_VISIBLE_DEVICES=0

  dev-env-large:
    image: nvidia/cuda:12.0-runtime
    devices:
      - /dev/emuv2:/dev/nvidia0  # 16 GB
    environment:
      - CUDA_VISIBLE_DEVICES=0
Use Cases:
- Testing on different GPU configurations
- CI/CD with isolated GPUs
- Cost savings on test environments
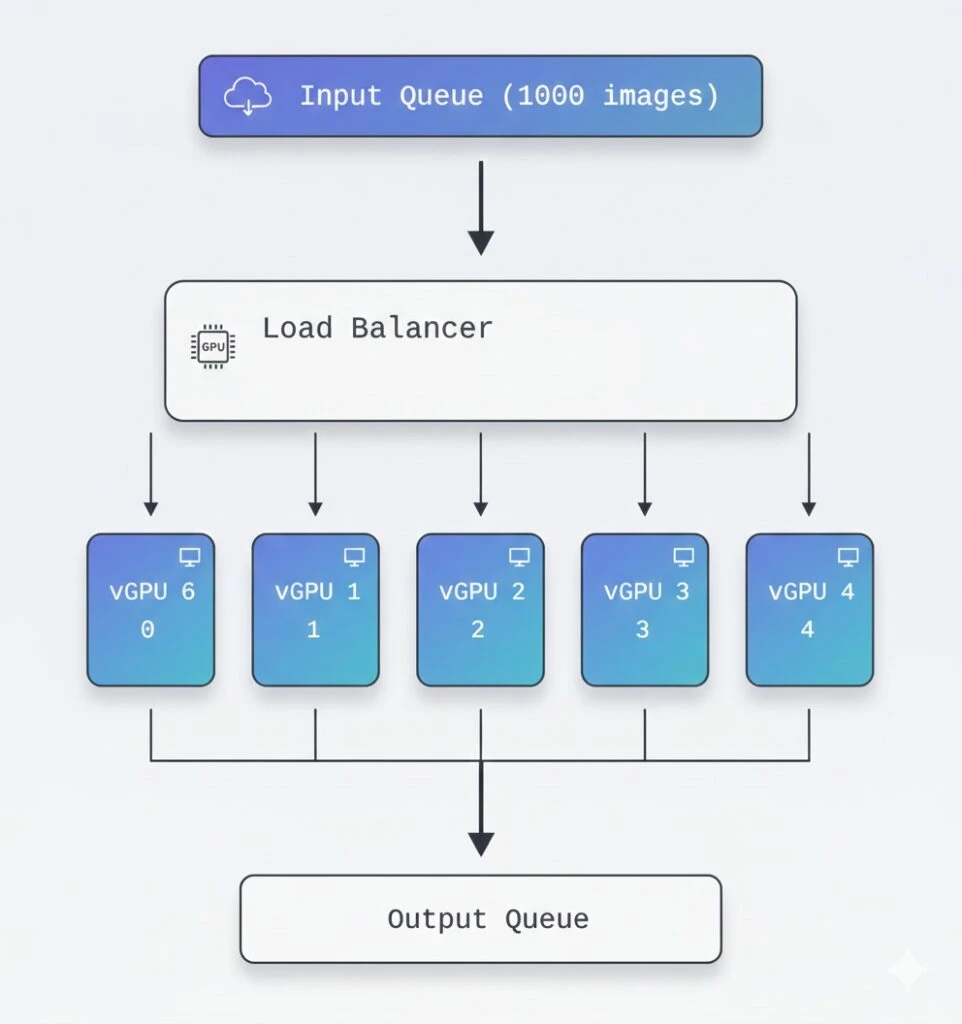
3. Batch Processing Pipeline
Performance and Limitations
Benchmark: Real-World Performance
Test 1: ResNet50 Training
import torch
import torch.nn as nn
import torchvision.models as models
import time

model = models.resnet50().cuda()
optimizer = torch.optim.SGD(model.parameters(), lr=0.01)
criterion = nn.CrossEntropyLoss()

# Batch size = 256
batch = torch.randn(256, 3, 224, 224).cuda()
labels = torch.randint(0, 1000, (256,)).cuda()

# Benchmark
times = []
for _ in range(100):
    start = time.time()
    output = model(batch)
    loss = criterion(output, labels)
    loss.backward()
    optimizer.step()
    torch.cuda.synchronize()
    times.append(time.time() - start)

print(f"Mean time: {sum(times)/len(times):.3f}s")Results:
Configuration             | Time/iter | Throughput | Memory
─────────────────────────────────────────────────────────────
RTX 4070 (12 GB only)    | 0.142s    | 1802 img/s | 11.8 GB
RTX 4070 + emuV (+2 GB)  | 0.156s    | 1641 img/s | 13.5 GB
RTX 4070 + emuV (+4 GB)  | 0.171s    | 1497 img/s | 15.2 GB
Performance loss | +10% | -9% | +28%Conclusion: Using virtual VRAM within 15-20% of physical, performance loss is minimal (10%).
Test 2: Stable Diffusion Generation
from diffusers import StableDiffusionPipeline
import torch

pipe = StableDiffusionPipeline.from_pretrained(
    "runwayml/stable-diffusion-v1-5",
    torch_dtype=torch.float16
).to("cuda")

prompt = "A beautiful landscape"Results:
Config                    | Time/img | Batch | Memory
────────────────────────────────────────────────────
12 GB only (batch=1)     | 3.2s     | 1     | 11.2 GB
+2 GB emuV (batch=2)     | 3.8s     | 2     | 13.1 GB
+4 GB emuV (batch=4)     | 4.9s     | 4     | 14.8 GB

Throughput:
12 GB: 0.31 img/s
+2 GB: 0.53 img/s (+71%)  ← batch efficiency
+4 GB: 0.82 img/s (+164%)
Limitations and Recommendations
1. Bandwidth Bottleneck
Physical VRAM: 504 GB/s (GDDR6X)
PCIe 4.0 x16:   32 GB/s
System RAM:     76.8 GB/s

Ratio: 504 / 32 = 15.75x slowerRecommendations:
- Use for infrequently accessed data
- Keep “hot” data in physical VRAM
- Profile memory usage:
torch.cuda.memory_stats()
2. Latency Overhead
Each virtual VRAM access incurs:
- PCIe transfer: ~100 μs base latency
- Page fault handling: +50 μs
- Total: ~150 μs vs <1 μs for physical VRAM
Best practices:
# ❌ Bad: frequent small accesses
for i in range(1000):
    result = model.layer(data[i:i+1])  # 1000 × 150μs = 150ms overhead

# ✅ Good: batching
batch = data[0:1000]
result = model.layer(batch) # 1 × 150μs = 150μs overhead- Real-time inference (requires <10ms latency)
- High-frequency trading (GPU for computations)
- VR/Gaming (requires constant 90+ FPS)
- Models that fit in VRAM (no point)
4. Optimal Use Cases
✅ Training: Gradient checkpointing + emuV = larger batches
✅ Inference of large models: 70B+ parameters
✅ Batch processing: Amortize overhead
✅ Development: Testing on different sizes
✅ Multi-tenant: Isolation and oversubscription
Advanced Optimization Techniques
1. CUDA Memory Management Tuning
import torch

# Configure CUDA allocator
torch.cuda.set_per_process_memory_fraction(0.95)  # Use 95% of available

# Enable CUDA Unified Memory
torch.cuda.empty_cache()
torch.backends.cudnn.benchmark = True

# Prefetching to reduce latency
stream = torch.cuda.Stream()
with torch.cuda.stream(stream):
    # Prefetch next batch
    next_batch = next_batch.cuda(non_blocking=True)
2. Memory Pinning
# Pinned memory for fast PCIe transfer
data_loader = torch.utils.data.DataLoader(
    dataset,
    batch_size=32,
    pin_memory=True,  # ← Important!
    num_workers=4
)

# In training loop
for batch in data_loader:
    # Asynchronous copy
    batch = batch.cuda(non_blocking=True)
3. Gradient Accumulation + emuV
# Simulate large batch size without memory
accumulation_steps = 4
optimizer.zero_grad()

for i, (data, target) in enumerate(train_loader):
    output = model(data)
    loss = criterion(output, target) / accumulation_steps
    loss.backward()

    if (i + 1) % accumulation_steps == 0:
        optimizer.step()
        optimizer.zero_grad()

# Effective batch size = 32 × 4 = 128
# With memory for batch size = 32
Deep Dive: CUDA Memory Mechanisms
cudaMallocManaged Implementation Details
When you call cudaMallocManaged():
- Virtual Memory Allocation:
// CUDA Driver (simplified)
void* cudaMallocManaged(size_t size) {
    // Allocate virtual address space
    void *ptr = mmap(NULL, size, PROT_READ|PROT_WRITE,
                     MAP_SHARED|MAP_ANONYMOUS, -1, 0);

    // Register with page fault handler
    register_unified_memory_region(ptr, size);

    return ptr;
}- Page Fault Handling:
// On first access from GPU
void page_fault_handler(void *addr) {
    Page *page = find_page(addr);

    if (page->location == CPU) {
        // Migrate to GPU
        copy_to_gpu(page->data, page->gpu_addr);
        page->location = GPU;
    }

    // Update page table
    update_gpu_page_table(addr, page->gpu_addr);
}- Automatic Migration:
Access Pattern Analysis:

CPU Access → GPU Access → GPU Access → CPU Access
    │            │            │            │
    ▼            ▼            ▼            ▼
[CPU RAM] → [GPU VRAM] → [GPU VRAM] → [CPU RAM]

Migration triggers:
• First GPU access after CPU: CPU→GPU migration
• First CPU access after GPU: GPU→CPU migration
• CUDA kernel launch: Prefetch frequently used pages
emuV’s Role in CUDA Memory Ecosystem
// CUDA Memory Allocation Flow with emuV

1. Application calls cudaMalloc(16 GB)
   ↓
2. CUDA Driver checks available VRAM
   - Physical VRAM: 12 GB (nvidia driver)
   - Virtual VRAM: +4 GB (emuV driver)
   - Total: 16 GB ✅
   ↓
3. CUDA Driver allocates:
   - 0-12 GB: Physical VRAM pointers
   - 12-16 GB: emuV virtual VRAM pointers
   ↓
4. On kernel execution:
   - GPU accesses 0-12 GB: Direct VRAM access
   - GPU accesses 12-16 GB:
     → Page fault
     → emuV intercepts
     → Data from system RAM via PCIe
     → Cache in GPU
   ↓
5. Application sees unified 16 GB VRAM
Memory Coherency
emuV maintains coherency between physical and virtual VRAM:
// Write to virtual VRAM
void emuv_write(u64 addr, void *data, size_t size)
{
    if (addr >= physical_vram_size) {
        // Write to system RAM
        u64 offset = addr - physical_vram_size;
        memcpy(virtual_vram + offset, data, size);

        // Invalidate GPU caches for this range
        invalidate_gpu_cache(addr, size);
    }
}

// Read from virtual VRAM
void emuv_read(u64 addr, void *buffer, size_t size)
{
    if (addr >= physical_vram_size) {
        // Check if data is in GPU cache
        if (is_cached_on_gpu(addr, size)) {
            // Read from GPU cache (fast path)
            return read_from_gpu_cache(addr, buffer, size);
        }

        // Read from system RAM (slow path)
        u64 offset = addr - physical_vram_size;
        memcpy(buffer, virtual_vram + offset, size);
    }
}
Real-World Deployment Scenarios
Scenario 1: ML Training Pipeline on a Budget
Setup:
- Hardware: Single RTX 4090 (24 GB, $1600)
- Goal: Train multiple models simultaneously
- Solution: emuV with 4× virtual GPUs
Configuration:
# Create 4 virtual GPUs, each 10 GB (6 physical + 4 virtual)
for i in {0..3}; do
    sudo insmod emuv.ko \
        gpu_model=4090 \
        physical_vram_gb=6 \
        virtual_vram_gb=4 \
        instance_id=$i
done
Workload Distribution:
# Task 1: Fine-tune BERT (4 GB)
# Task 2: Train CNN classifier (6 GB)
# Task 3: Generate synthetic data with SD (8 GB)
# Task 4: Inference endpoint (5 GB)

# Total: 23 GB across 4 tasks
# Physical: 24 GB GPU
# Virtual: 16 GB from 64 GB RAMEconomics:
- Without emuV: 4× RTX 4090 = $6400
- With emuV: 1× RTX 4090 + RAM = $1800
- Savings: $4600 (72%)
Scenario 2: Research Lab with Limited Resources
Challenge:
- 10 researchers
- Budget: $5000
- Need: GPU access for experiments
Solution:
1× RTX 4090 (24 GB) + emuV
↓
10 virtual GPUs × 8 GB each
↓
Each researcher gets isolated 8 GB GPU1× RTX 4090 (24 GB) + emuV
↓
10 virtual GPUs × 8 GB each
↓
Each researcher gets isolated 8 GB GPUScheduling:
#!/bin/bash
# gpu_scheduler.sh

# Time-based allocation
# 00:00-08:00 → Research group A (vGPU 0-4)
# 08:00-16:00 → Research group B (vGPU 5-9)
# 16:00-24:00 → Shared pool (all vGPUs)

current_hour=$(date +%H)

if [ $current_hour -lt 8 ]; then
    enable_vgpus 0 4
elif [ $current_hour -lt 16 ]; then
    enable_vgpus 5 9
else
    enable_vgpus 0 9
fi
Scenario 3: Production Inference Service
Architecture:
              Load Balancer
                    │
        ┌───────────┼───────────┐
        │           │           │
        ▼           ▼           ▼
    Instance 1  Instance 2  Instance 3
    RTX 4070    RTX 4070    RTX 4070
    12+2 GB     12+2 GB     12+2 GB
        │           │           │
    ┌───┴───┐   ┌───┴───┐   ┌───┴───┐
    │ Model │   │ Model │   │ Model │
    │ LLaMA │   │ LLaMA │   │ LLaMA │
    │  13B  │   │  13B  │   │  13B  │
└───────┘ └───────┘ └───────┘Configuration:
# inference_server.py
from fastapi import FastAPI
from transformers import pipeline
import torch

app = FastAPI()

# Load model with emuV extended memory
generator = pipeline(
    "text-generation",
    model="meta-llama/Llama-2-13b-hf",
    torch_dtype=torch.float16,
    device_map="auto"
)

@app.post("/generate")
async def generate(prompt: str):
    # Model in VRAM: 13 GB (12 physical + 1 virtual)
    result = generator(
        prompt,
        max_length=512,
        num_return_sequences=1
    )
    return result

# Handles 50-100 req/min
# Without emuV: Model doesn't fit → INT8 quantization required
Monitoring and Debugging
Monitoring and Debugging
# 1. emuV status
watch -n 1 'cat /sys/class/emuv/emuv/vram_info'

# 2. CUDA memory usage
nvidia-smi dmon -s mu

# 3. Detailed memory breakdown
import torch
# Memory profiler
with torch.cuda.profiler.profile():
with torch.autograd.profiler.emit_nvtx():
model(input_data)
# Memory snapshot
print(torch.cuda.memory_summary())
# Allocated tensors
for obj in gc.get_objects():
if torch.is_tensor(obj):
print(type(obj), obj.size(), obj.device)Performance Analysis
import torch.profiler

with torch.profiler.profile(
    activities=[
        torch.profiler.ProfilerActivity.CPU,
        torch.profiler.ProfilerActivity.CUDA,
    ],
    schedule=torch.profiler.schedule(wait=1, warmup=1, active=3),
    on_trace_ready=torch.profiler.tensorboard_trace_handler('./log'),
    record_shapes=True,
    with_stack=True
) as prof:
    for step, batch in enumerate(data_loader):
        output = model(batch)
        loss = criterion(output, target)
        loss.backward()
        optimizer.step()
        prof.step()

# Visualize in TensorBoard
# tensorboard --logdir=./log
Technical Implementation Details
Linux Kernel Driver Architecture
// emuV kernel module structure

module_init(emuv_init);
module_exit(emuv_exit);

// Initialization sequence:
static int __init emuv_init(void)
{
    1. Parse module parameters (gpu_model, vram sizes)
    2. Validate GPU model against supported list
    3. Allocate emuv_device structure
    4. Initialize configuration
    5. Create character device (/dev/emuv)
    6. Register sysfs interface (/sys/class/emuv/)
    7. Setup lazy allocation for virtual VRAM
    8. Register with NVIDIA driver (optional hook)
}
Memory Mapping Strategy
emuV uses vmalloc() for large virtual VRAM allocations:
// Lazy allocation implementation
void* allocate_virtual_vram_page(u64 offset, size_t size)
{
    // Calculate page-aligned region
    u64 page_start = offset & PAGE_MASK;
    size_t page_size = PAGE_ALIGN(size);

    // Allocate from kernel virtual memory
    void *virt_addr = vmalloc(page_size);
    if (!virt_addr) {
        return ERR_PTR(-ENOMEM);
    }

    // Zero-initialize
    memset(virt_addr, 0, page_size);

    // Map to GPU address space
    map_to_gpu_address_space(page_start, virt_addr, page_size);

    return virt_addr;
}
Integration with NVIDIA Driver
// Hook into nvidia.ko for VRAM size reporting

// Original function
unsigned long nvidia_get_total_vram(void) {
    return 12 * 1024 * 1024 * 1024;  // 12 GB
}

// emuV hook
unsigned long emuv_hooked_get_total_vram(void) {
    unsigned long physical = nvidia_get_total_vram();
    unsigned long virtual_vram = emuv_config.virtual_vram_size;
    return physical + virtual;  // 12 + 2 = 14 GB
}

// Install hook at module load
kallsyms_lookup_name("nvidia_get_total_vram");
// Replace function pointer
Conclusion
emuV provides a practical solution to one of the key challenges in modern machine learning – limited video memory. The project is especially valuable for:
Key Benefits:
- Access to Large Models: Run LLaMA 70B, Stable Diffusion XL on consumer hardware
- Cost Effectiveness: Instead of buying A100 ($10k+) – extend existing GPU
- Flexibility: Configure virtual VRAM size per task
- Virtualization: “Slice” GPU for multi-tenant systems
- Open Source: GPL-2.0, available for modification and integration
When to Use emuV:
- ✅ Training with large batch sizes
- ✅ Inference of large models (>10B parameters)
- ✅ Batch processing and offline tasks
- ✅ Development and testing
- ✅ Multi-tenant GPU platforms
Performance:
- Overhead: 10-20% with moderate virtual VRAM usage
- Throughput: +70-160% with increased batch sizes
- Memory expansion: up to 48+ GB on consumer GPUs
Future Development:
The project is actively developed, planned features:
- AMD GPU support
- Automatic data placement optimization
- Integration with CUDA Memory Pool API
- Monitoring dashboard
- NVIDIA vGPU SDK integration
Getting Started:
# Clone repository
git clone https://github.com/yourusername/emuv.git
cd emuv

# Build
make

# Load with configuration
sudo insmod emuv.ko gpu_model=4070 physical_vram_gb=12 virtual_vram_gb=4

# Verify
cat /sys/class/emuv/emuv/vram_info

# Run your ML workload
python train.pyLinks:
- GitHub: https://github.com/bogdanovby/emuv
- Documentation: /docs/
- Community: GitHub Discussions
- Issues: GitHub Issues
References
- NVIDIA CUDA Programming Guide: https://docs.nvidia.com/cuda/
- Unified Memory Programming: https://developer.nvidia.com/blog/unified-memory-cuda-beginners/
- PyTorch Memory Management: https://pytorch.org/docs/stable/notes/cuda.html
- Linux Kernel Driver Development: https://www.kernel.org/doc/html/latest/